Shortly after last year’s 2019 late archery deer season and my bowhunting partner’s ATV accident, I sold my 1998 Honda Foreman 450ES.

Seeing Kelly be tossed around and breaking his collarbone had me second-guessing a lot of things, especially with my daughter getting older and taller. I decided to make the move to a side by side. In December I found a 2010 Polaris RZR 800 Trail model that was bought new and solely owned by a retired couple. It was a solid purchase and am blessed to have it.
I chose the Trail version because the outside wheel base is legal for many of the trails I utilize for hunting season. I had also hoped it would fit nicely into my truck bed. I was mistaken, it was not going to fit. The front RZR wheels just caught the wheel wells on my 2006 Duramax and I slid into the headliner bending it. There was no way to load the UTV and pull our camper as is. This began a discussion with my wife about what to do.
I am not sure which was first but in our area there are a wide variety of decks or racks built to haul everything from snowmobiles, ATVs and yes, even UTV’s comfortably in the bed of a pickup truck. The average retail price for one of these decks is around $2,600.00 not including mounting hardware and ramps. If you have the money and need the option to pull a camper these might just be what you are looking for. The other option is buy a toy hauler camper but that is even more of an investment.
Given my background, I decided to look into possibly building one myself. During high school and college, I had learned how to draft, build, and weld. Post College and starting Graduate School, I worked residential and commercial construction. During my first year of marriage I worked construction again and hung steel for a hospital expansion as well as poured footings for a Super Walmart.
I started my process by looking at what was already out there on the market. The design I ended up using closely parallels ToyUp Industries out of Horseshoe Bend, Idaho. (If I were to buy one, that is where I would go.) My design would allow 2-door 800’s, 900’s and 1000’s to load. It would also fit short beds for Chevy/GMC, Ford, and Ram full-size trucks. I went this route so if I ever wanted to sell it and upgrade to a toy-hauler it would be more marketable.
After taking measurements, lots and lots of measurements, I started the design process with graph paper, triangles, scale ruler, Staedtler Mars pencils, and did my basic layout in 1/8″ scale. It was fast and dirty in order to figure out how much material I would need and a basic cut list. The next decision was what wall thickness of rectangular steel tube to use. I knew from research that ToyUp uses three different thicknesses but since I had altered my design to not include a rail as they do for added strength, I opted to use a robust wall throughout. This would make my rack heavier. I purchased my materials and began working on my cut list. A few days later, I was in Apex Design & Fabrication’s shop. With their help, I welded up the platform that would support the lower deck and upper deck.

The next step was to add the lower deck sections. This took some time to complete, making sure it was a square as possible. If you have welded before, you know steel will pull during the process. After another long evening the lower deck portions were added on.

Next was the hardest part of the design. Using a steel chop saw, we cut the supports for the cantilever sections. Cutting 45° angle on one side with the 22.5° on the other over a 3″ piece is not easy but getting it right ensures both strength and the rack being parallel with your truck cab. Once we had the support sections tacked together, we worked our way around tacking everything in place.

From this point on, we started finishing out the runners and adding reinforcements. At the front of the cantilever rail, we added a rated weldable d-ring. All the way around the rack we welded smaller rated d-rings for securing the rack to the bed of the truck and the UTV to the rack.

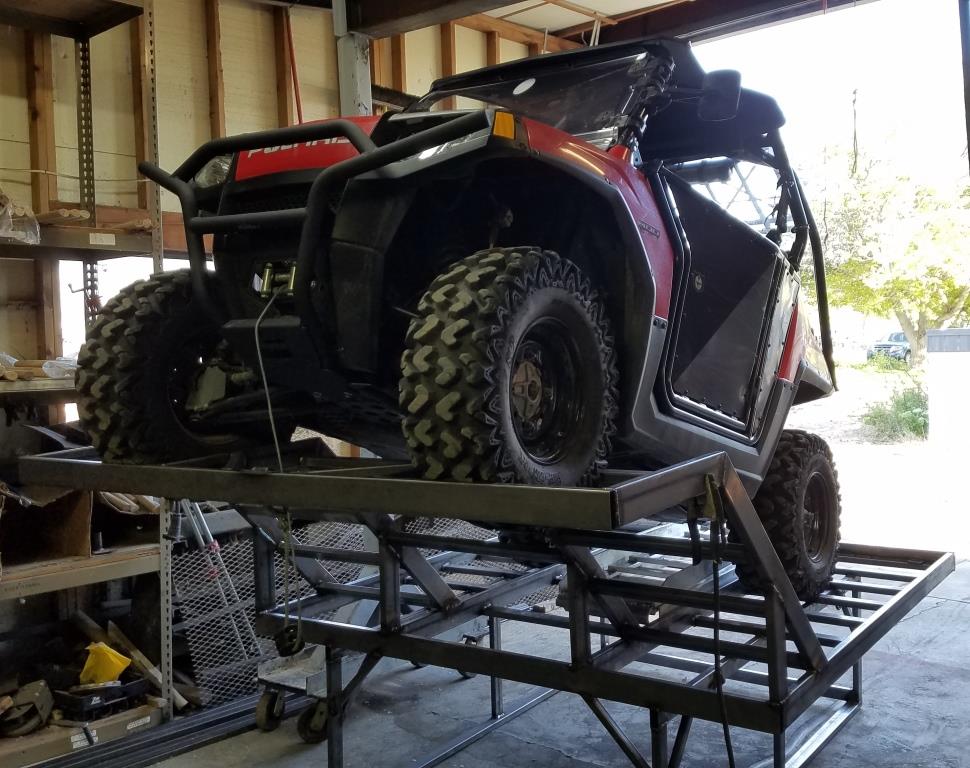
After all this, it was time to lay down some bead, a lot of bead. We finally got to a point where we were ready to test it out for the first time and see what would happen. I got to be the first volunteer being it was my project to begin with. We put on some ramps and I started up slowly. The ramps and rack didn’t budge and the cantilever design sits the RZR’s engine weight squarely in the middle of the rack.

I have said it before, men push limits. So you might have guessed the next thing we did. Yep, we loaded it up into my Chevy truck. I have to say, it gets a bit of getting used to.

Now, from the picture, you might be hoping my wife has called a psychiatrist. Well, she hasn’t, at least not yet. You also might be asking yourself other questions. Questions like, how did he load it, how is it tied down, will it go under an overpass and possibly more.
Luckily, I had built how I was going to load it by myself into the design. I use a ground stake to foot the rack with jacks on the forward section to give it a slight rise.

Ground stake 
Jacks
With the help of the winch on the RZR, I attach the winch cable to the center hook and pull the rack up into the air.

Close up of winch cable attached 
Winch cable attached
It is important to note that you should park your UTV some distance away from the rack. It is also suggested you use wheel chocks on it as well as shown below. This is for safety as the weight of rack can be enough to pull your UTV as you activate the winch.

With everything secured, use the winch to lift the rack upwards enough to where you can back your truck’s tailgate up to it. If you don’t want to ding your tailgate, you do not need to touch the rack. Instead, you can use the winch to lower it down.

Once you lower it down, you will have to lift the rack into the bed and slide it forward. If you have rubber mats like I do or spray-in bed liner you might get some resistance. Once it is on the tailgate enough, you can get into the bed and walk it back to your headliner. (I will be adding 3″closed-cell foam later on to make sure I don’t crash the headliner.)

Once you have the rack forward and in place, it is time to tether it to your truck bed. The most common method is the use of turnbuckles and quick links. You might be tempted to use ratchet straps but I would caution you on this. Ratchet straps are good for a lot of uses or might be a quick fix on a rack like this. However, you can apply too much torque and actually damage your tie-down loops or truck bed. I would strongly recommend using rated hardware. I have had experience and training with understanding working loads and you will spend some money in this department to get the right hardware. Turnbuckles allow you to get a tight connection using your hands without over-torquing.

Turnbuckle 
Rated carabiner
Next to load your UTV you will need ramps. I literally lucked out with a pair on Facebook Marketplace. I wanted and found 12′ ramps and they fit perfectly with the design.

Ramps catches back end 
Ramps folded up nicely
This was probably one of the more ambitious things I have done in a while. I want to give a special thanks to Apex Design & Fabrication, LLC for being willing to allow me to use their shop and equipment. It was fun being behind a welder again and great to get out of the house a bit. I still need to grind some welds, drive test it with the RZR and then finish it out with powder coating or truck bed liner kit to keep it from rusting. All in, it was a fun project. Yes, it will fit under an overpasses but I will have to use a mobile app at fast food places, no drive-thru services with this rig. If this is something you think you might want, I can tell you and would highly recommend to you- go buy one. After all the time and effort, $2,600 isn’t a bad price at all!
L. Yarbrough, Bucks & Beers